For inquiries related to order or shipping, please contact us at contact@animalhospital.store
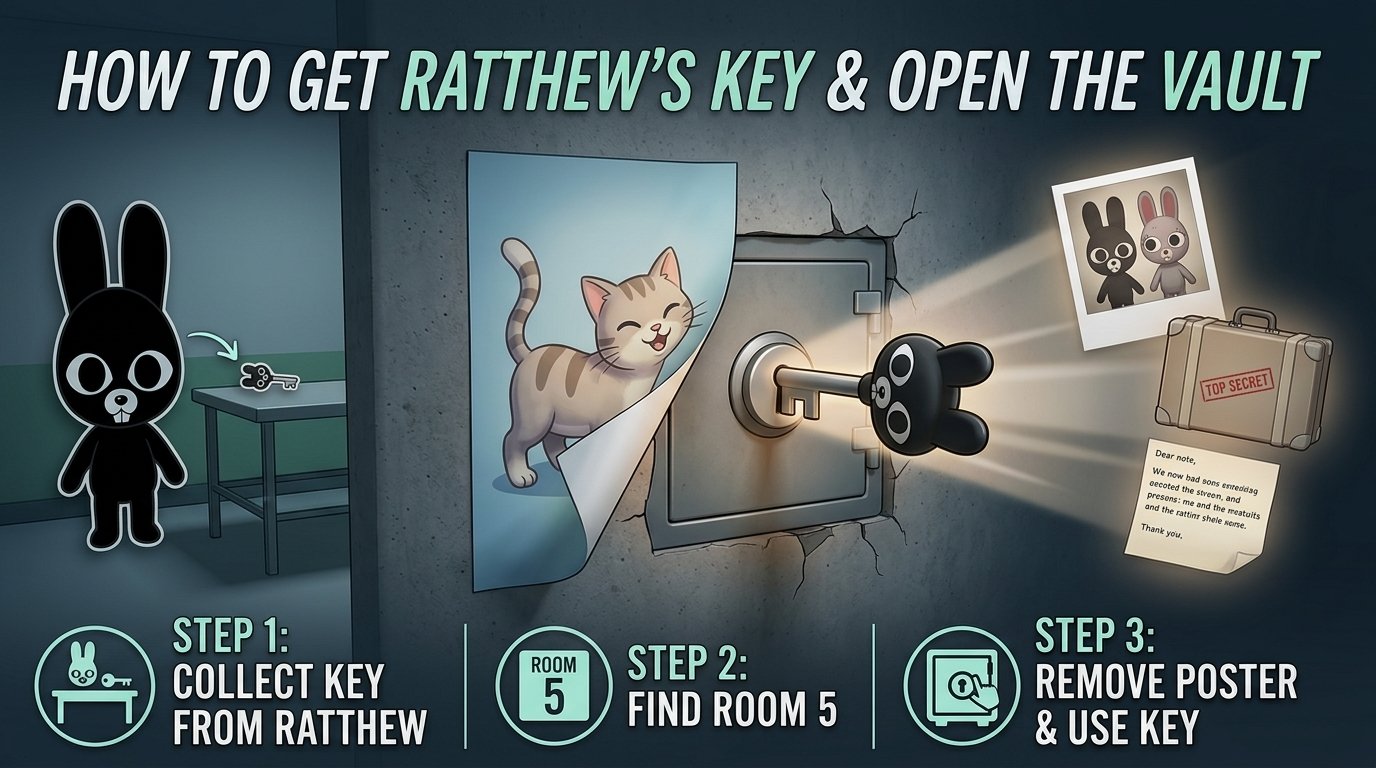
In Animal Hospital, Ratthew’s Key is obtained by progressing through his visits and completing his dialogue interactions. After Ratthew leaves, collect the key and take it to Room 5.
In Room 5, remove the cat poster to reveal the hidden safe, then use Ratthew’s Key to open it. The exact Shift can vary between community guides, so follow Ratthew’s dialogue sequence rather than relying on a fixed Shift number.
1. Continue through Ratthew’s visits
Keep progressing through Shifts until Ratthew appears at the hospital. Serve him and complete the interaction instead of leaving the conversation unfinished. The checked guides consistently connect the key to Ratthew’s recurring dialogue sequence.
The exact point is reported in two ways. Some walkthroughs place it at approximately Shift 8–10. Another describes the trigger as Ratthew’s fifth conversation. These are community-reported timings, not a confirmed universal Shift requirement.
- Confirmed by multiple guides: Ratthew’s visits and dialogue are part of the key route.
- Community-reported: the key usually appears around Shifts 8–10.
- Also community-reported: the key may follow the fifth Ratthew interaction.
- Not established by the checked sources: a single guaranteed Shift number that works for every player.
2. Wait for Ratthew to leave
After the relevant interaction, Ratthew leaves the check-in area and leaves the key behind. Look at the place where he was sitting or at the nearby table, depending on the guide’s description, and collect the item.
One walkthrough also reports a note near the key. The available sources agree on the key, but their descriptions of the exact drop location are not identical. If it isn’t immediately visible, check the spot Ratthew occupied and the nearby table after the conversation has fully ended.
3. Travel to Room 5
Take the key to Room 5. The key isn’t used at the hospital’s main entrance or on a visible keypad. The sources place its destination inside the room, behind a cat poster.
Once you’re in Room 5, interact with the poster on the wall. Pulling it down or removing it reveals the hidden safe, also called the Vault in community documentation.
4. Use the key on the hidden safe
With the poster removed, interact with the safe and use Ratthew’s key. The checked guides describe this as a direct key interaction. They do not provide a separate Vault code that you need to discover.
If the safe does not open, check the order of the steps: finish the Ratthew interaction, collect the key after he leaves, enter Room 5, remove the poster and then interact with the safe. The sources do not establish that the key can be used anywhere else.
What is inside the Vault?
Community location documentation reports several story-related objects inside the hidden area. These include a photograph of Ratthew’s twin sister, Rattina; a suitcase marked “Top Secret”; and a note referring to a successful Shadow experiment.
Those contents are reported by community documentation rather than established here as a complete canon explanation of the story. The items connect Ratthew, Rattina, Dr. Harlow and the Shadow experiment in the source material, but the available evidence does not settle every detail of that connection.
Why the Shift number is easy to get wrong
Search results often give a specific number because it makes a walkthrough easier to scan. The sources checked for this page don’t give one consistent number, though. One guide says the key appears after about Shifts 8–10, while another identifies the fifth conversation with Ratthew.
That difference may reflect how the interaction is counted, how a guide describes progression, or changes in the game. The safer instruction is to track Ratthew’s dialogue rather than stop at a number. If he hasn’t left the key behind, continue playing through later Shifts and speak with him whenever he returns.
Quick route
- Continue through Shifts until Ratthew visits.
- Serve Ratthew and finish each dialogue interaction.
- After the relevant visit, wait for him to leave.
- Collect the key from his former seat or the nearby table.
- Go to Room 5.
- Remove or pull down the cat poster.
- Use the key on the safe behind it.
Is there a Vault code?
The checked guides describe a key interaction, not a numeric code. If you’re searching for a combination, that search is aimed at the wrong part of the puzzle. The practical requirement is obtaining Ratthew’s key first.
This does not prove that no code could ever be added in a future update. It means the available sources for this guide do not document one.
Can you get the key before the reported Shift?
The sources do not establish a guaranteed early trigger. They describe the key as part of Ratthew’s interaction chain and give approximate or interaction-based timing rather than a confirmed rule that applies in every situation.
For that reason, don’t treat Shift 8, Shift 9 or Shift 10 as a password. Use those numbers only as rough community guidance, then check Ratthew’s dialogue and the area where he was sitting.
What if Ratthew doesn’t leave the key?
First, make sure the conversation has finished and that Ratthew has actually left. Then inspect his seat and the nearby table. The guides differ slightly on the exact placement, so checking both locations is more useful than searching for a code.
If the item still doesn’t appear, the available sources don’t provide a confirmed troubleshooting method. Continue through later Shifts and repeat the interaction when Ratthew returns. A fixed reset rule or guaranteed trigger after a failed interaction is not established in the material checked here.
What does the Vault reveal about Ratthew and Rattina?
The reported photograph identifies Rattina as part of the story material connected to the Vault. The suitcase and note add references to the Shadow experiment. These objects are useful clues, but they don’t by themselves prove every theory about the characters or the experiment.
The sources support a connection between the Vault’s contents and the wider Ratthew, Rattina and Dr. Harlow story. They do not establish every character’s motives, nor do they provide enough evidence to label every interpretation as canon.
Canon, community report and unknown details
| Claim | Status |
|---|---|
| Ratthew’s interaction chain leads to a key. | Community-reported and supported by multiple walkthroughs. |
| The key is collected after Ratthew leaves. | Community-reported. |
| The key is used in Room 5. | Community-reported and consistent across the checked guides. |
| The cat poster reveals the hidden safe. | Community-reported and consistent across the checked guides. |
| The exact trigger is Shift 8, 9 or 10. | Unknown. Guides give approximate timings that do not fully agree. |
| The fifth Ratthew conversation is always the trigger. | Community-reported, but not established as a universal rule. |
| The Vault’s items explain the entire Shadow storyline. | Unknown. The objects provide clues, not a complete confirmed explanation. |
Related merchandise
If you collect character items connected with this part of the story, the Ratthew and Rattina plush toy is listed in the current store inventory. The product is merchandise related to the characters, not a source for confirming in-game lore.
So, the next step is straightforward: keep speaking with Ratthew through his visits, collect the key only after he leaves, then check the poster in Room 5. If the timing doesn’t match a guide’s Shift number, follow the dialogue chain instead.
Sources and verification
Last verified: 18 Sep 2026.
Each row below says what the source was used for and how the page was read. A row marked as a search summary was not opened in full, so it was not treated as independent confirmation.
| Source | Type | What we used it for | Checked |
|---|---|---|---|
| Animal Hospital — Roblox listing | Platform listing | Official Roblox listing for Animal Hospital (Anomaly), describing the night-shift veterinary gameplay and anomalous patients. | 17 Sep 2026 — search summary only, page not opened |
| Animal Hospital: Finding Ratthew’s Key and Opening the Room 5 Safe | Independent secondary guide | Explains how to serve Ratthew, collect the key he leaves behind, remove the Room 5 poster, and open the hidden safe. | 18 Sep 2026 — search summary only, page not opened |
| Animal Hospital Roblox Key: Room 5 Safe Guide | Independent secondary guide | Documents the Ratthew interaction chain, the hidden Room 5 safe, and the lore evidence revealed inside. | 18 Sep 2026 — full page |
| Animal Hospital Roblox Map: Wings, Rooms & Routes | Independent secondary guide | Describes the Medical Wing’s Rooms 1–5, the Emergency Wing’s Rooms 6–8, and Room 5’s conditional story safe. | 18 Sep 2026 — full page |
| Animal Hospital Safe Code: Ratthew’s Key and the Room 5 Hidden Safe | Independent secondary guide | Clarifies that the Room 5 secret uses a physical key rather than a verified numeric safe code. | 18 Sep 2026 — full page |
How to Open the Vault
Once you have Ratthew’s Key, head to Room 5 and remove the cat poster to reveal the hidden safe. Use the key on the safe to open the Vault.
If the key does not appear, make sure you have completed Ratthew’s dialogue and waited for him to leave. The exact Shift may vary, so focus on completing his interactions rather than following a fixed Shift number.